
THIS IS A DRAFT - TEST - UPDATE IMAGES
A Simple, Step‑By‑Step Guide
AI agents are now within reach for every team—not just data scientists. With Microsoft Copilot Studio, you can design, connect, and publish an intelligent agent that answers questions, triggers workflows, and taps your own business data—all without heavy coding.
In this guide, we’ll build a simple “Customer Support Copilot” that can answer FAQs, share product info, and check order status. You’ll go from zero to published in under an hour.
What You’ll Build
- Agent: “Customer Support Copilot”
Core capabilities:
- Greet users and guide them to help topics
- Answer FAQs from your SharePoint/website/documents
- Trigger a Power Automate flow to check order status
- Channels: Web and Microsoft Teams
- Governance: Environment‑scoped, DLP‑friendly, with analytics for continuous improvement
Tip: Use a dev/test environment first. Promote to production once validated.
Step 1 — Define Purpose & Scope (5–10 mins)
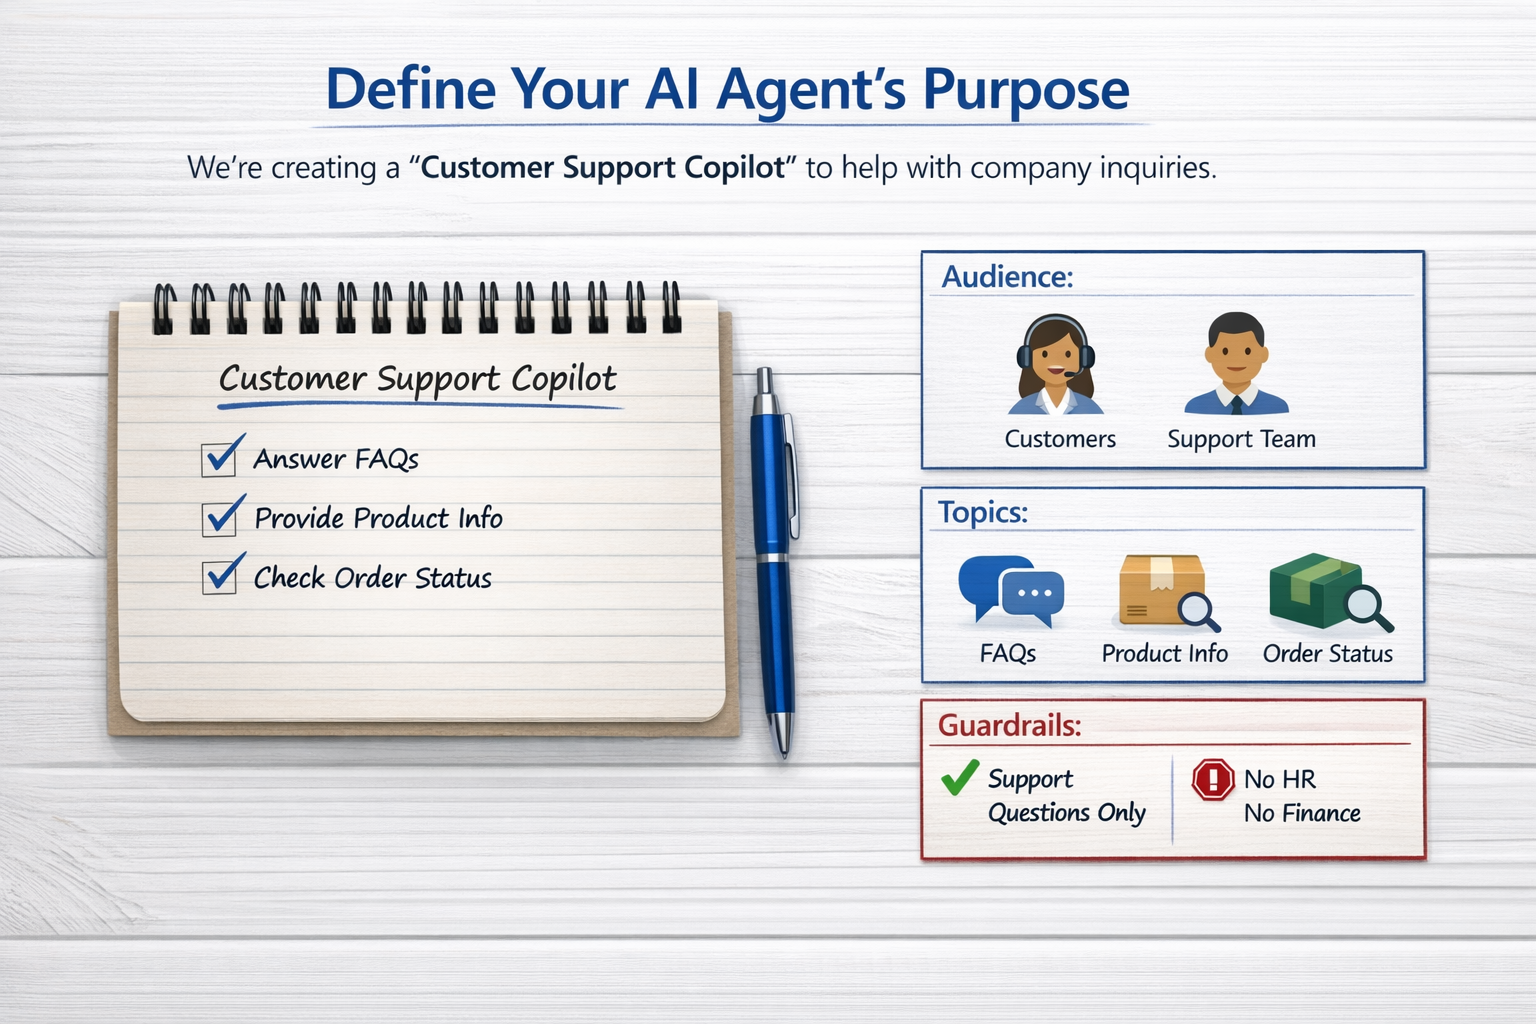
Clarify what your agent will—and won’t—do. For our demo:
- Audience: Customers and internal support staff
- Use cases: FAQs, product details, order status
- Tone: Helpful, concise, friendly
- Guardrails: Don’t answer outside support topics; route to human if uncertain
Step 2 — Create a New Copilot (3 mins)
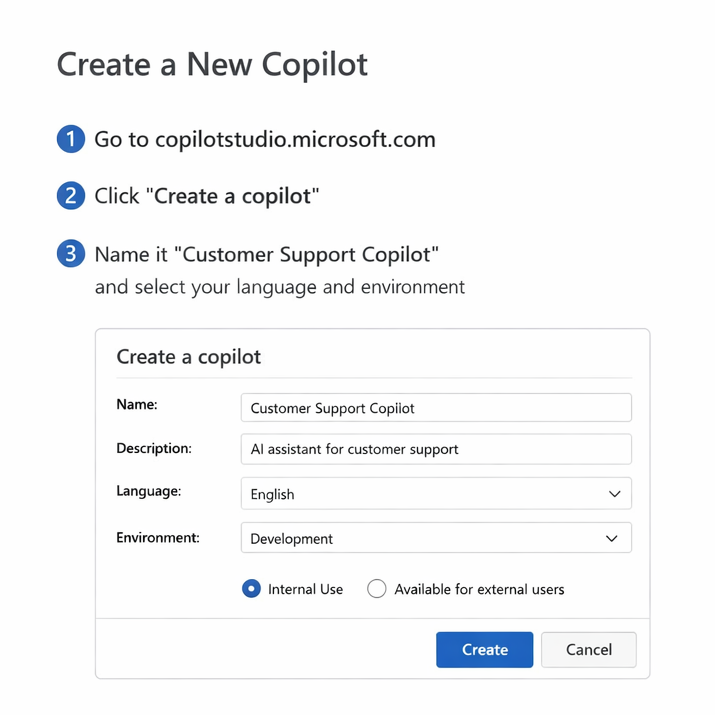
- Go to https://copilotstudio.microsoft.com
- Select Create a copilot → give it a name: “Customer Support Copilot”.
- Choose language and environment.
- Save.
Step 3 — Add Topics (10–15 mins)
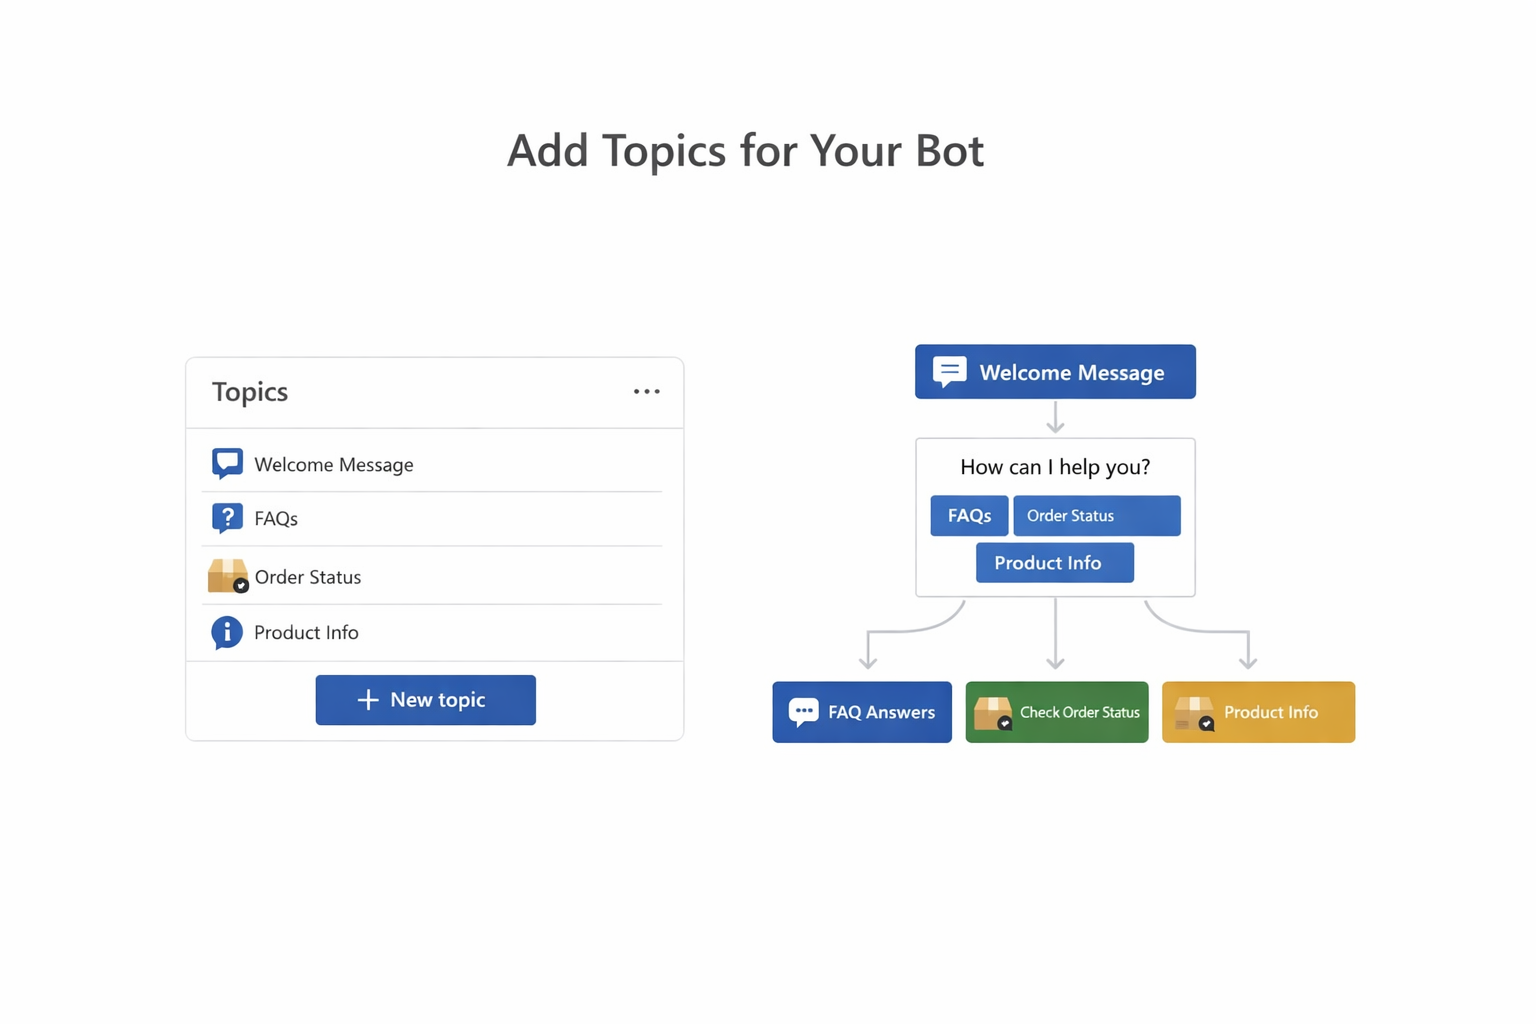
Topics are conversation building blocks: they define triggers, messages, questions, and actions. Create three topics:
- Welcome & Routing
- Trigger: System Greeting
- Bot says: “Hi! I can help with FAQs, product info, or order status. What do you need?”
- User choice: Buttons → FAQs, Product Info, Order Status, Talk to a Human
- FAQs
- Trigger: “faq”, “question”, “help”, “support”
- Action: Enable Generative Answers from connected data (we’ll add this next).
- Fallback: “I’m not fully sure—shall I connect you to a human?”
- Order Status
- Trigger: “track order”, “order status”, “where is my order”
- Ask: “Please enter your Order ID.”
- Validate: Basic length/pattern check
- Action: Call a *Power Automate flow (Step 5) → return status
- Bot says: “Your order {OrderID} is {Status} with ETA {ETA}.”
Step 4 — Connect Knowledge Sources (5–10 mins)
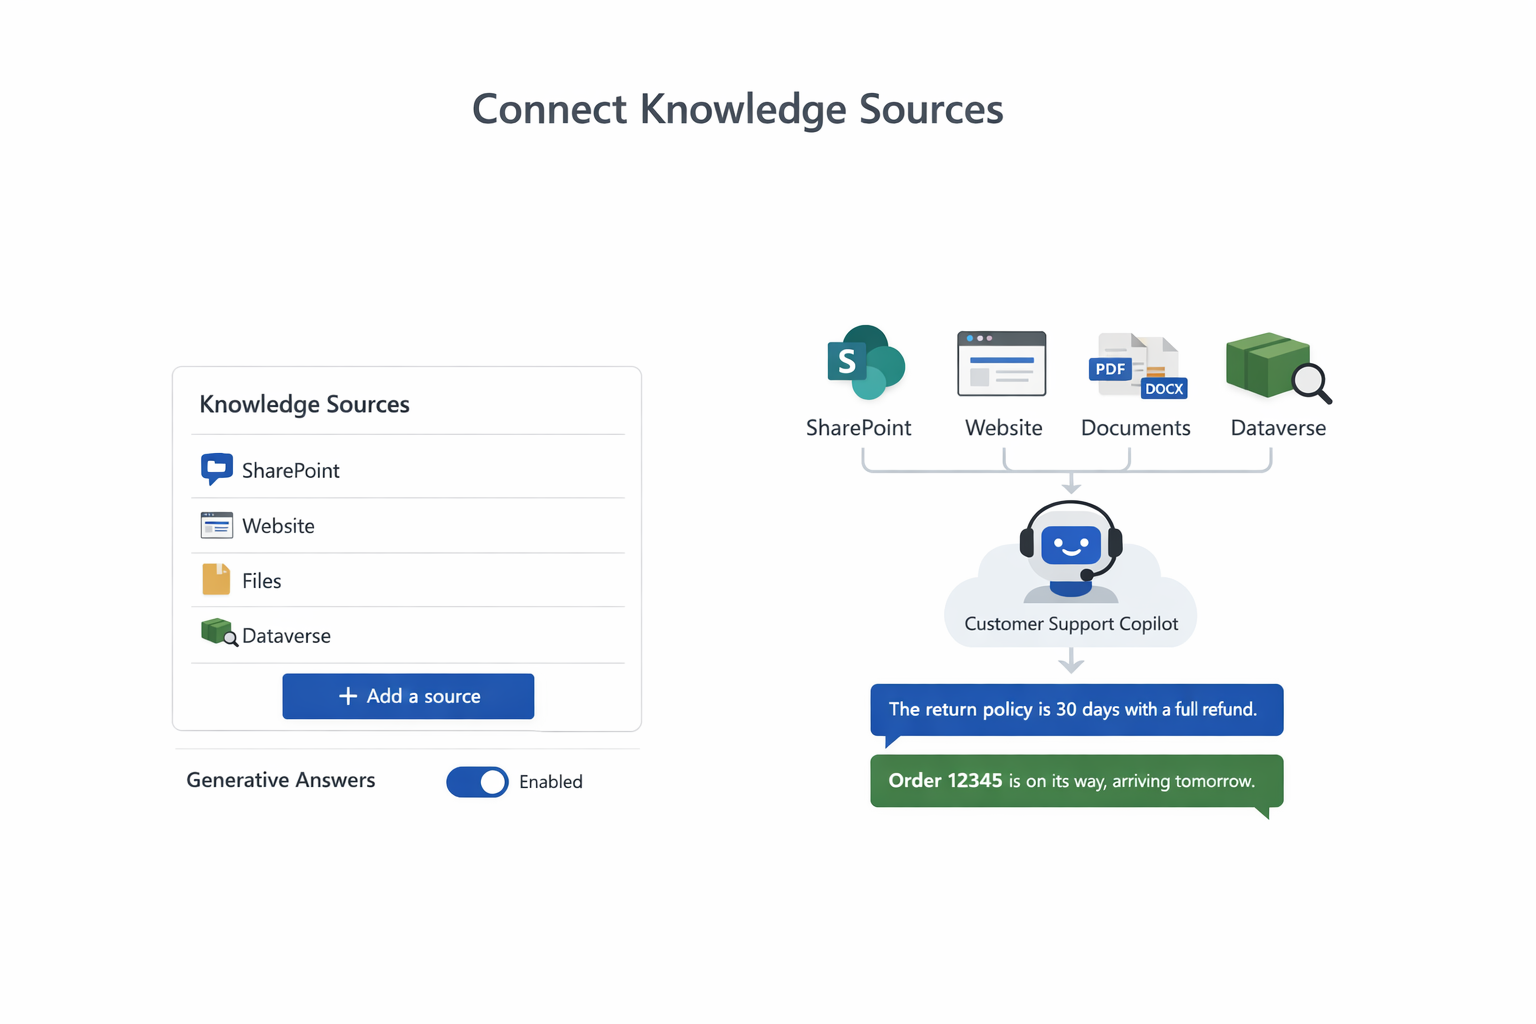
To make answers useful, connect data:
- SharePoint site containing FAQs (Pages or a list)
- Public website (docs or help center)
- Files (PDF/DOCX) uploaded as sources
- Dataverse tables (optional, for structured content)
Then enable Generative Answers on the FAQ topic to ground responses in your content.
Good practice: Keep your sources tidy and scoped. Use role‑based permissions so the agent only answers from content users are allowed to see.
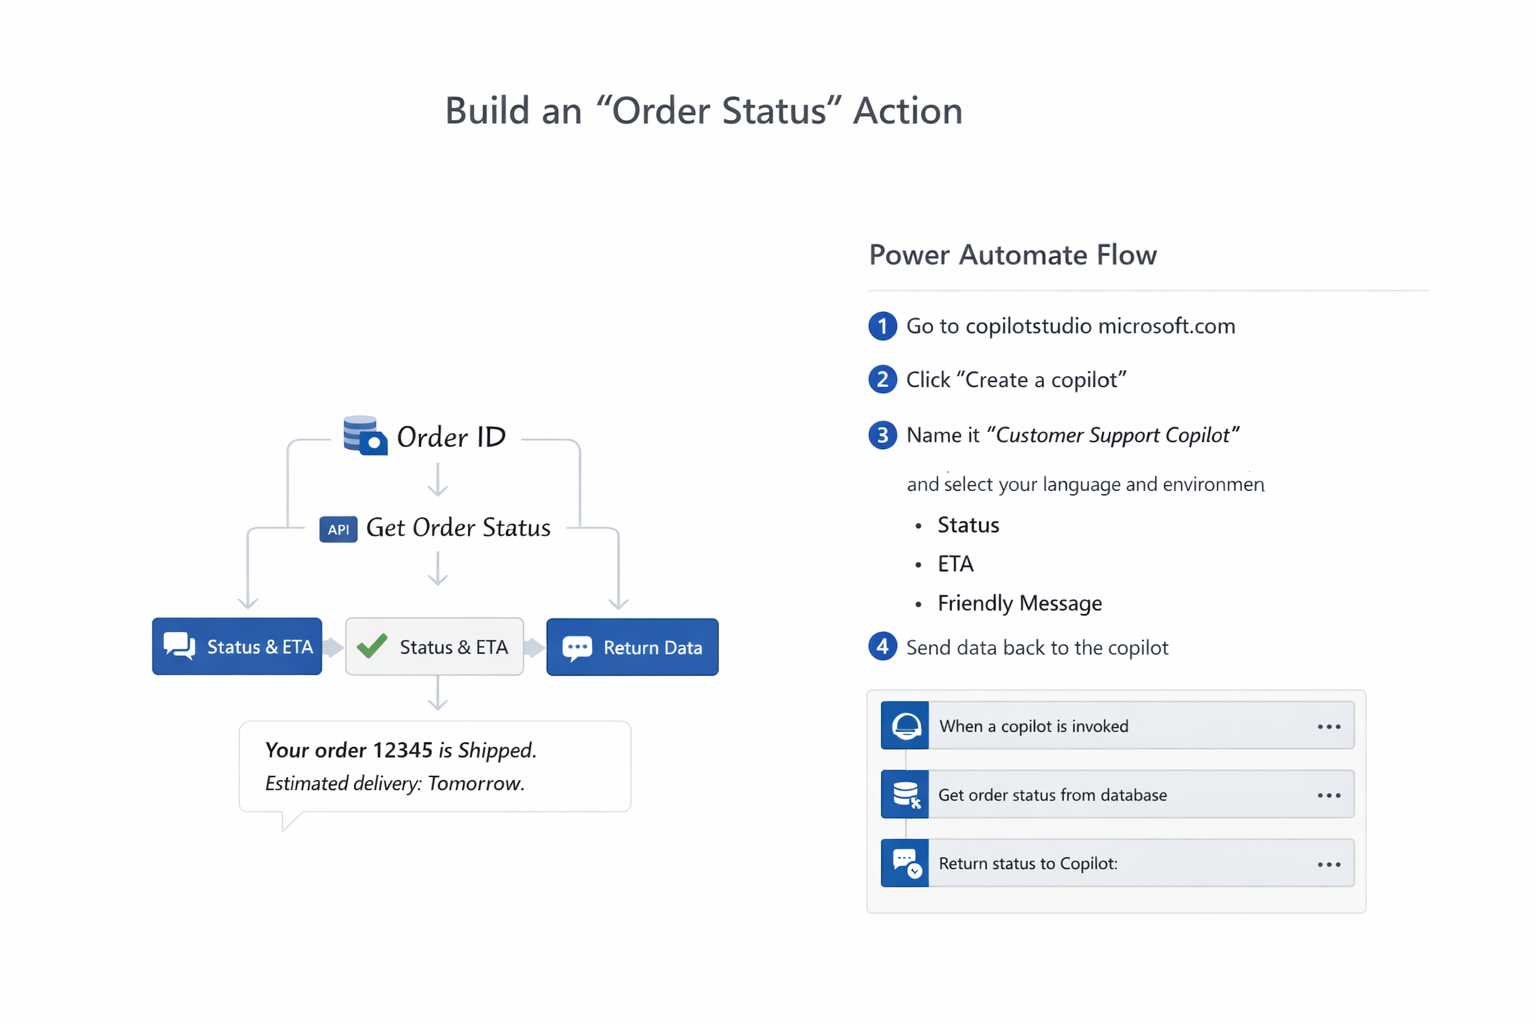
Step 5 — Build an “Order Status” Action with Power Automate (15–20 mins)
- In the Order Status topic, add an Action → Create a flow.
- In Power Automate:
- Trigger: “When a Copilot is invoked” (or “Manual input” with parameter OrderID)
- Step: Call your order API / Dataverse / SQL to retrieve status and ETA
- Return: Status, ETA, FriendlyMessage
- Back in Copilot Studio, map the flow outputs to variables.
- Bot says: Render the friendly message and suggest next steps.
No API yet? Mock the response in Power Automate with a Compose step so you can finish the build, then swap in the real connector later.
Step 6 — Add Guardrails (3–5 mins)
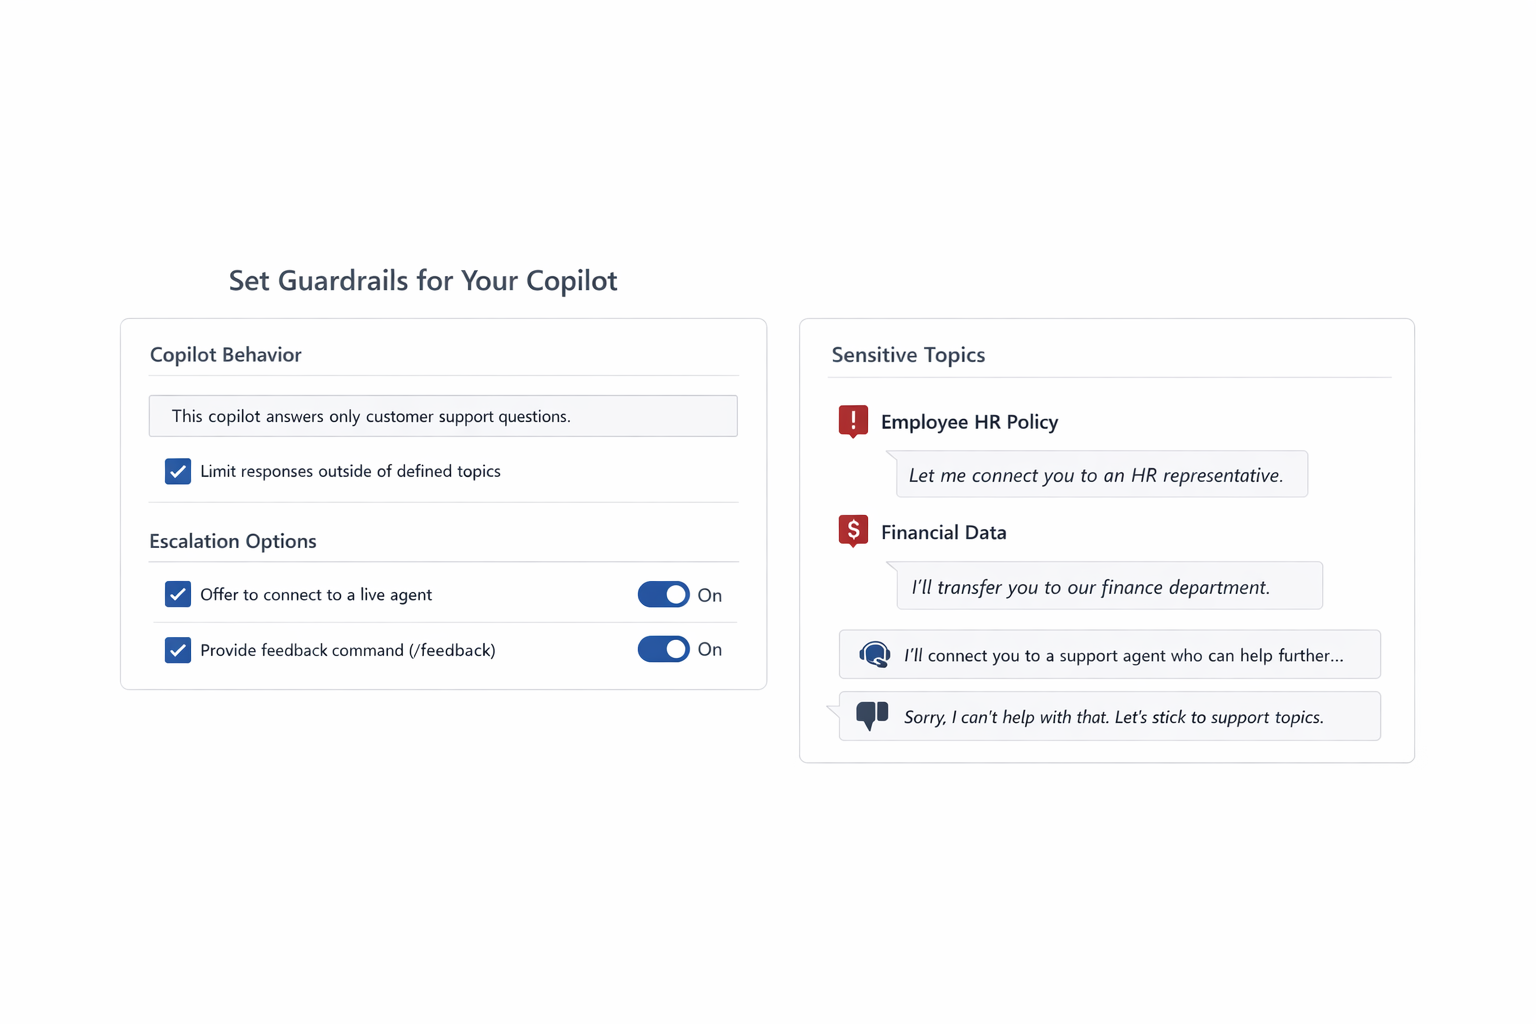
- Set content boundaries: “This copilot answers only customer support questions.”
- Configure sensitive topics and escalation to a human agent or helpdesk form.
- Add a /feedback command to capture thumbs‑down and comments.
Step 7 — Test in the Canvas (10 mins)
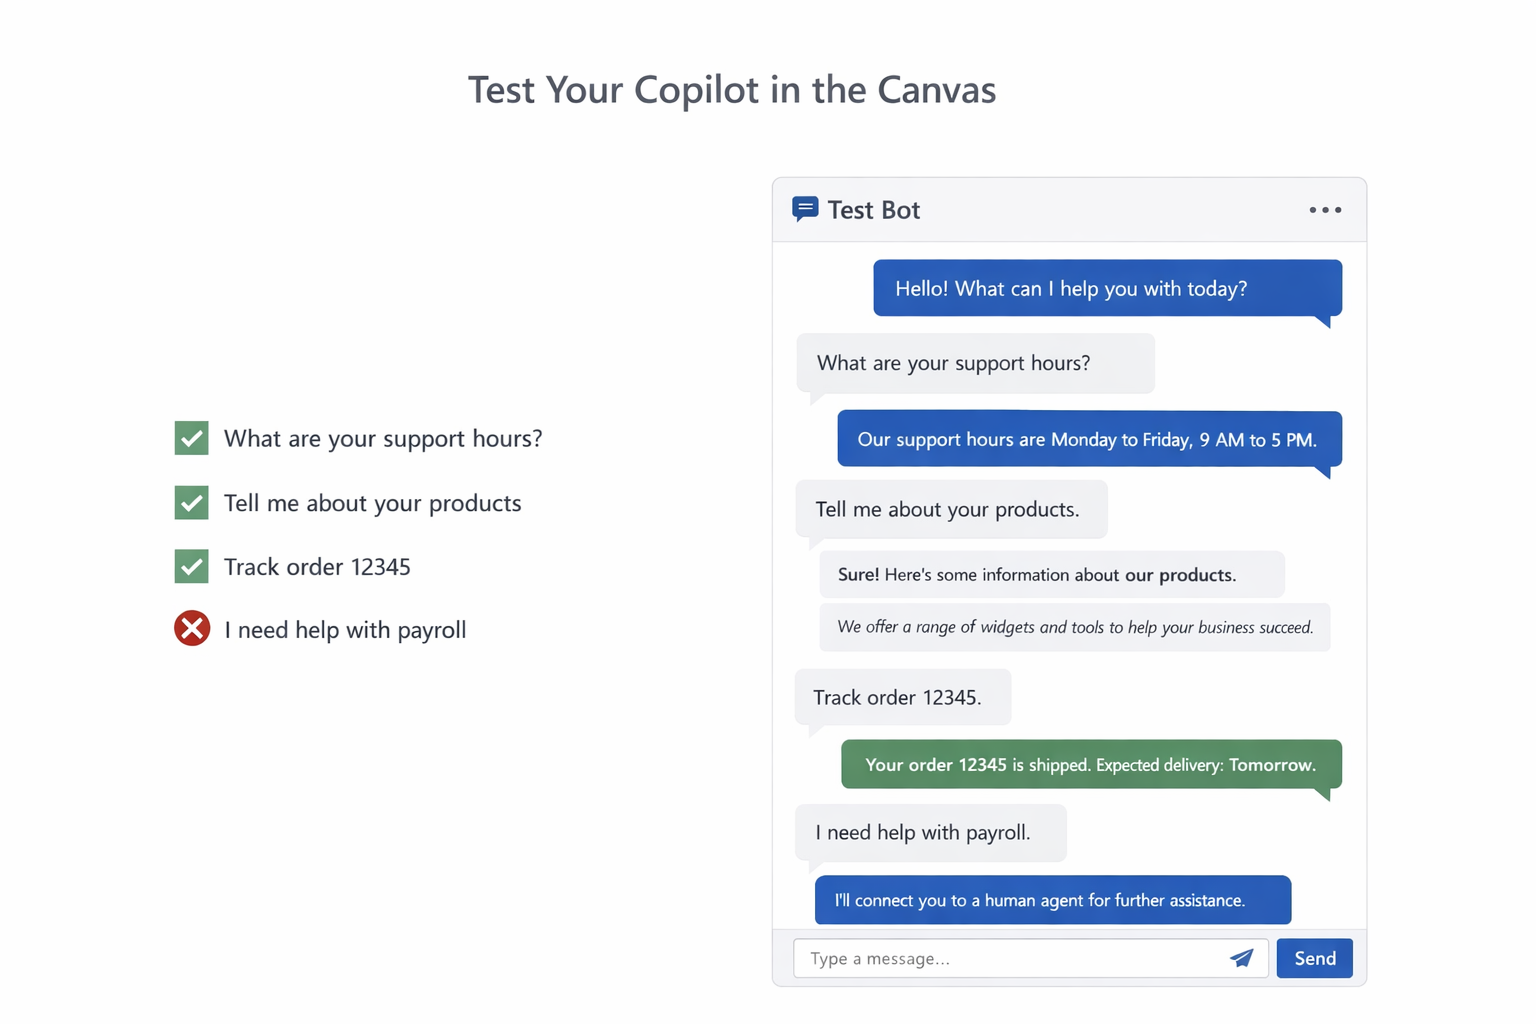
Use the built‑in test pane:
- Try: “What are your support hours?” → expects grounded FAQ answer
- Try: “Tell me about product X features” → product info source answer
- Try: “Track order 12345” → flow returns status
- Try: Off‑topic request → routed to human/decline with safe response
Iterate on prompts, triggers, and messages until the conversation feels natural.
Step 8 — Publish & Add Channels (5–10 mins)
- Click Publish.
- Choose channels:
- Microsoft Teams (add to a team or pin for support reps)
- Web (embed via code snippet on your help site)
- Set permissions and audience.

Step 9 — Monitor & Improve (ongoing)
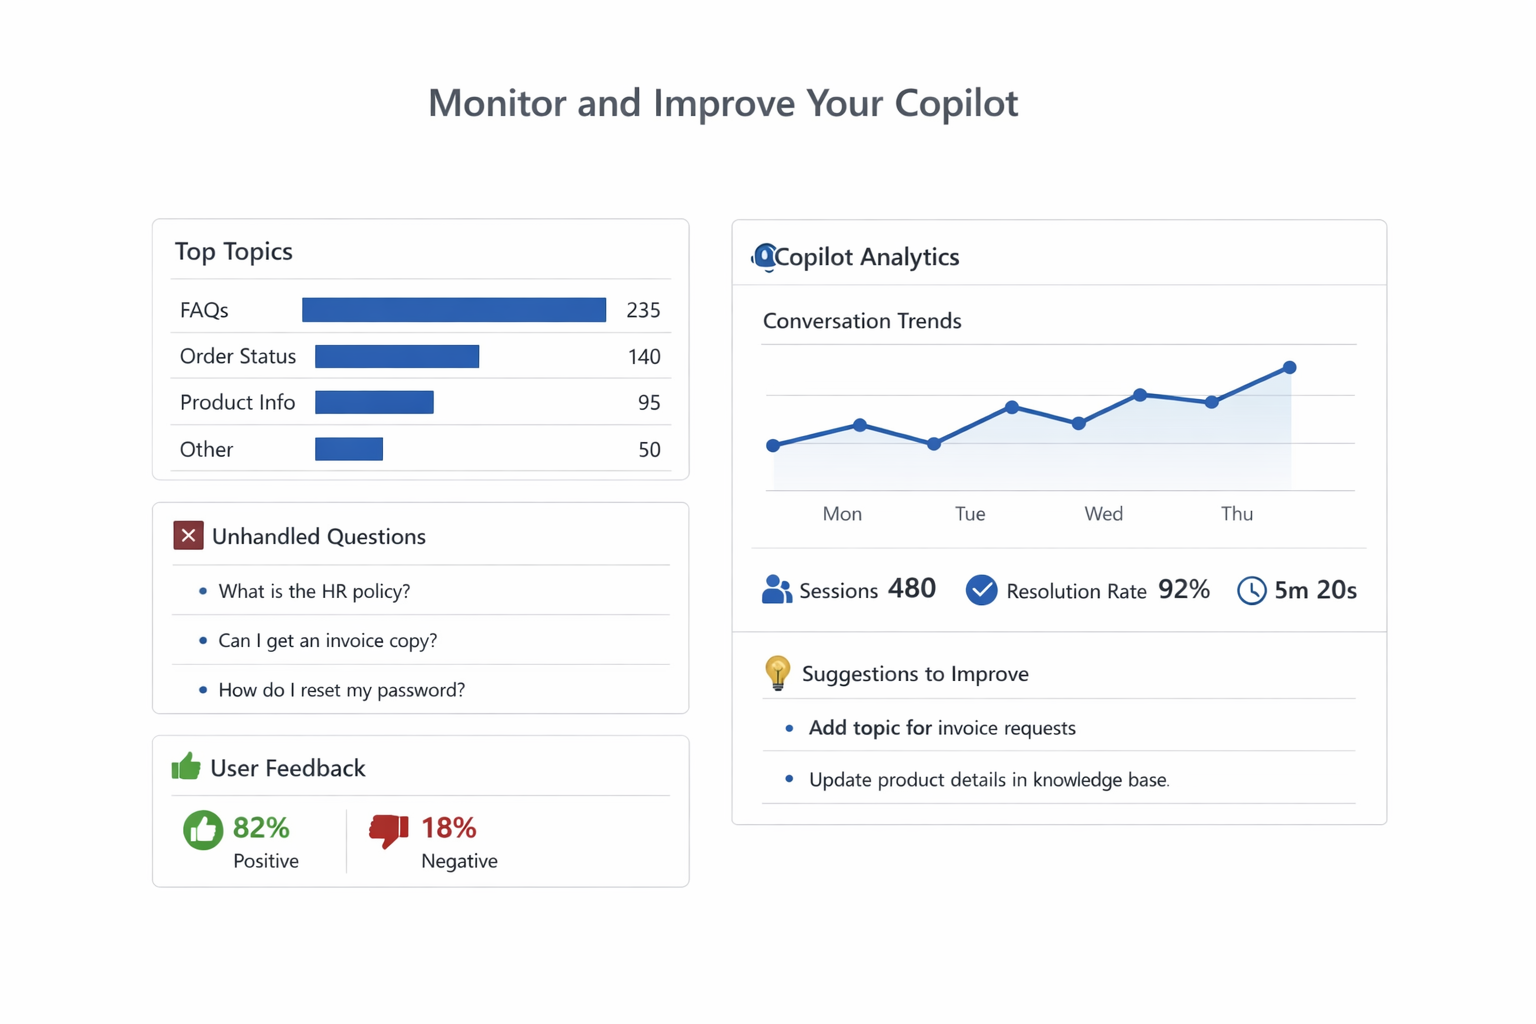
Review analytics weekly:
- Top intents / topics triggered
- Unanswered questions (create new topics for these)
- Resolution rate & session length
- Feedback (thumbs up/down, comments)
Tune sources, add examples, and refine prompts to lift answer quality.
Copy‑Paste Snippets You Can Reuse
Welcome Prompt (short):
1
2
1 Hi! I’m your Customer Support Copilot. I can help with FAQs, product information, and order status.
2 Choose an option to get started, or ask your question in your own words.
Fallback (safe & helpful):
1
2
1 I might not have enough information to answer that confidently.
2 Would you like me to connect you to a person, or try rephrasing your question about our products or orders?
Order Status Success:
1
2
1 Order {OrderID} is currently {Status}. Estimated delivery: {ETA}.
2 Anything else I can help with—FAQs, product info, or another order?
Escalation (human handoff):
1
2
1 I’ve opened a support ticket and shared your details with our team. You’ll receive an update shortly.
2 Reference: {TicketID}
Troubleshooting Checklist
- Generative answers are vague → Narrow your sources; add a concise “About” prompt for the copilot’s role.
- Wrong answers → Remove noisy sources, add canonical FAQ pages, and set higher grounding requirements.
- Order flow fails → Test the Power Automate action independently; verify connection/auth and parameter mapping.
- Teams channel missing → Ensure the app is allowed by Teams admin and you’ve published to the correct environment.
Where to Go Next
- Add role‑aware experiences (internal vs. external audiences)
- Connect Dataverse/SQL for richer product details
- Use Adaptive Cards for structured responses (e.g., order summary card)
- Localize to additional languages and A/B test prompts